How to Use
The Basics
Multiscreen Blank displays your current monitor configuration in a scaled visual representation. This eliminates guesswork in trying to figure out which monitor is #1 or #5 since Windows can arbitrarily re-order them. Here are some basic operational concepts:
- Double click on a monitor icon to toggle its state
- Single click on a monitor icon to add it to the selection. Click in the blank area around the monitor icons to clear the selection.
- Click and drag over several monitor icons to select them
- Right click on a monitor icon for more options, including the option to blank/reveal all selected monitors, place them in a group, or invert the current selection.
You can rename individual monitors with a friendly name to make them easier to identify. This is especially useful for context menus that don't display the relative position of the monitor -- if a friendly name is not specified, the device ID or virtual bounds will be used as the "name" instead.
Additionally, you may double click anywhere on a blanked monitor to reveal it or right click for more options. (Note that the mouse cursor will be invisible unless you have enabled it in settings.) You can also press Esc to un-blank the screen that is currently active.
Screen Operations
A screen can be in one of three states: blanked, revealed, or dimmed. A blanked screen does not allow clicking through it but you can double-click on it to reveal. A dimmed screen allows click-through (and thus double-clicking will not un-dim it).
NOTE: All operations are done in software. A blanked screen will still exhibit LCD backlight glow (unless your monitor happens to have local or global dimming). Dimming likewise displays a software-based overlay rather than communicating with your monitor hardware.
Groups
Monitors may be placed into groups to make it easier to select and blank/reveal logically-related displays. Groups can be added, renamed, or deleted at any time, and appear as colored buttons at the top of the window. Group colors will match up with monitor colors so you can identify group membership at a glance.
By default, all monitors are members of the first group, but this group is hidden. Right-click on the blank space to the right of the list of groups to add a new group. Click on a group button to select all monitors in that group. Right-click to blank or reveal all monitors in the group, select the group (or everything outside of it), or make changes to the group itself.
The "All" group is a special group that is always present. It allows you to quickly select every monitor and provides a quick and easy way to blank all but the primary monitor. The primary monitor is defined in the Windows control panel and generally corresponds to the monitor that your taskbar appears on.
Virtual Screens
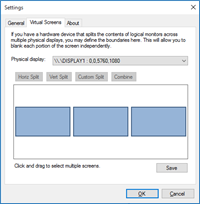
If you have a hardware-based screen splitter solution (such as a Matrox TripleHead2Go or various commercial video wall controllers) that splits a single logical monitor across multiple physical displays, you can set up virtual screens in Multiscreen Blank to allow you to still blank each physical display independently. Virtual screens will appear within Multiscreen Blank as if they were physical monitors and may be selected, added to groups, and so on.
Notification Area Icon
Much of Multiscreen Blank's functionality can be accessed from its notification area icon. Minimizing the main application window will minimize it to the tray, and double-clicking on the notification area icon will restore it. Right-clicking on the icon will present you with a menu of options. You may toggle individual screens (listed by bounding rectangle), blank/reveal groups of monitors, and quickly blank/reveal all screens, without opening the main window.
More Functionality
Multiscreen Blank does more than blanking screens – you can cover up parts of a screen and mirror one screen (or part of it) onto another.
See the Advanced Operation page for command-line arguments, detailed configuration, and troubleshooting.


